
How to Bind Vuze to a VPN?
Vuze, formerly known as Azureus, is a popular BitTorrent client that allows you to download and share large files over the Internet. Many people use Vuze to download torrents, but the issue with doing so is that using Vuze over an unprotected Internet connection can expose your identity.
If you’re concerned about your online privacy and security while using BitTorrent, you can bind Vuze to a VPN. Binding Vuze to a VPN will encrypt your Internet traffic and route it through a secure VPN server, thus hiding your IP address and online activities from prying eyes.
Here is why you should bind Vuze to a VPN and a step-by-step guide on how to do it.
Why You Should Bind Vuze to a VPN
Many users already take advantage of VPNs when it comes to their Internet access. VPNs disguise your identity when you go online, allowing you to surf the Internet in privacy. They’re particularly useful when torrenting for a number of reasons.
The first is that many ISPs and networks will either block torrents entirely or throttle torrent speeds in order to preserve bandwidth or maintain security. Using a VPN will allow you to bypass firewall restrictions on torrent use by disguising your Internet traffic.
Secondly, using a VPN with Vuze can improve your download speeds with some torrent sites. Some sites will throttle your download speeds unless you are contributing to the torrent’s upload rate. You can use a VPN to more easily contribute to a torrent’s upload rate, particularly if your ISP is throttling torrent traffic.
Finally, you may be wondering why binding Vuze to a VPN is necessary; why not simply turn your VPN on when torrenting and turn it off when you’re done? The answer is because like any other Internet connection, VPNs will sometimes disconnect for various reasons: server downtime, scheduled maintenance, unexpected glitches, and so forth.
If your VPN connection is disrupted while Vuze is actively downloading files, your real IP address will be exposed. Binding your VPN to Vuze will automatically stop any downloads or uploads should your VPN connection be disrupted, in the same manner as a VPN killswitch, ensuring your privacy.
How to Bind Vuze to Your VPN
Here are the steps to bind Vuze to your VPN.
1. Connect to your VPN
Make sure that your VPN is turned on. To verify that your VPN is on, use Google or another search engine to look up your IP address. If your IP address is showing a different geographical location then where you are physically located, your VPN is working.
2. Change Vuze to advanced mode
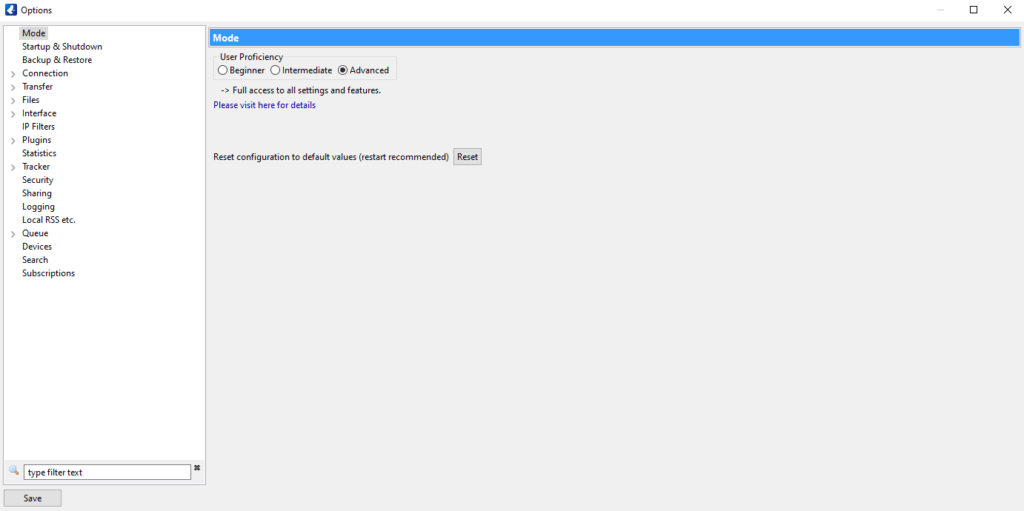
Vuze has several preset modes depending on user comfort and experience: Beginner, Intermediate, and Advanced. To bind your VPN to Vuze, you’ll first need to switch Vuze to Advanced mode if you haven’t already. You can do this by opening the Options menu and selecting “Advanced” under “User Proficiency.”
3. Input your VPN information
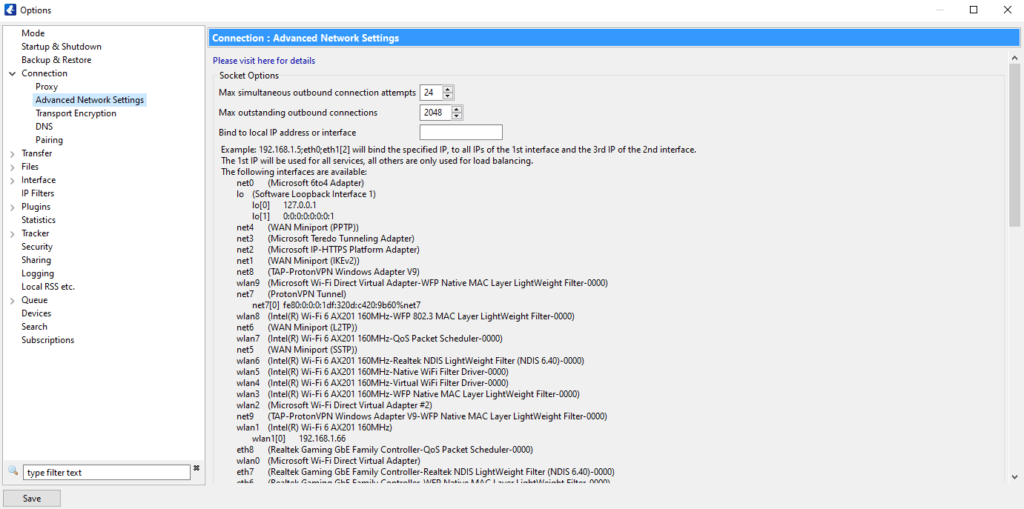
Under the “Connection” section of the Options menu, you can find a sub-heading labeled “Advanced Network Settings.” This is where you will need to add your VPN’s connection information in order to complete the binding process.
After navigating to this menu, select the option that reads “Bind to local IP address or interface.” The entry field next to this option allows you to input the network adapter of your VPN, which is how your VPN interfaces with the Internet in general.
Depending on which VPN you are using, the name of your network adapter will be different. Check your VPN’s settings or documentation in order to get the correct adapter name.
4. Enable IP binding enforcement
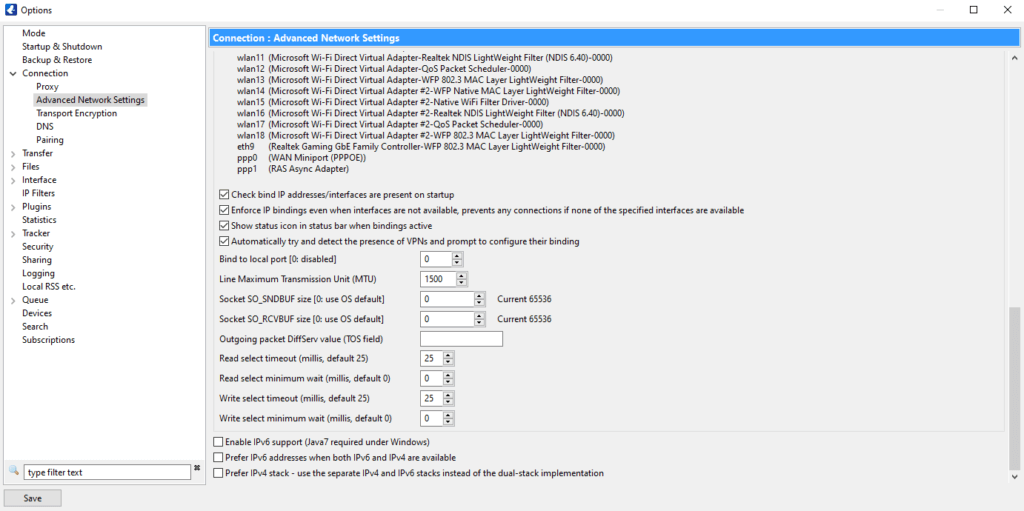
On the Advanced Network Settings screen, locate the option that says “Enforce IP bindings even when interfaces are not available.” By turning this option on, Vuze will automatically disconnect even if your VPN connection is not available, protecting you when you are torrenting.
5. Test your work
Now that you’ve set up the VPN bind, you’ll want to test it out. Check the bottom bar of Vuze for what appears to be an upside-down T with the word “Routing” next to it.
If you have set up the bind correctly and your VPN is connected, the upside-down T icon should be green, indicating that Vuze is connected and ready to torrent. If it’s red, that means the bind was configured incorrectly and Vuze is not connected, so you’ll need to double-check your settings.
If the icon is green, commence a test by downloading a public domain torrent file and disconnecting from your VPN during the download. If Vuze stops the download and the icon turns red, that means your bind is working; if it continues downloading, that means your bind is not working properly.
As an alternative to this method, you can test your VPN bind by manually disabling your VPN’s network adapter. You can do this in Windows by opening the Control Panel, selecting the Network and Internet menu, then selecting the Network and Sharing Center menu.
Once you have done this, select “Change adapter settings” and navigate to your VPN’s network adapter. After you start torrenting, disable the network adapter. If you set up the bind correctly, the Vuze Routing icon should turn red. Re-enable the network adapter and the torrent will restart.
Binding Vuze to a VPN: The Bottom Line
VPNs are extremely useful when it comes to torrenting, as they can help guard your privacy and anonymity. However, merely using a VPN when torrenting may not provide enough security. For added protection, consider binding your VPN to Vuze so you can torrent in absolute safety.
By following the steps in this guide, you’ll be able to easily bind your VPN to Vuze so you can use the software safely.
